| CLASSIC pasta | fresh egg pasta -- how to make | |||
|
|
Making one's own pasta, by hand and machine, provides two pluses: the resulting pasta is a truly wonderful taste treat, compared to the alternatives, and second, it allows one the special joy in the making, the becoming "one" with the pasta, as the Eastern gurus might say. It is true that in some major cities it is possible to get fresh egg pasta from Italian gourmet shops, which can be quite good, depending. Boxed pasta trying to be egg pasta is not. We use a simple fork and our hands to mix the flour and eggs and to meld the them together; and then our hands to knead the mixture into the perfectly-textured dough, ready for the machine. (We do not use any kind of a food processor for this activity but you can, see below). We then use the pasta machine for the final kneading and stretching process, to get the pasta into long, thin sheets. And finally we run the sheets through the cutting part of the machine to get our tagliolini or fettucine. amount of flour and eggs: More on this later, but for the moment, let us use: 3 large eggs and 2 cups of flour. Use unbleached all-purpose flour. Have another half-cup of flour at-the-ready in case it is needed. This should yield about one pound of fresh pasta. For a slightly larger portion of finished pasta, start with 4 large eggs and 3 cups of flour. first mixing steps: The classic method is to put the heap of flour onto a surface that will allow easy scraping with a pastry scraper. Make a mound of the flour, with a hollow, or well, in the middle to receive the eggs. >>>for green spinach pasta, prepare the spinach (see below) Drop the eggs into the hollow. With a fork beat, or whip, the eggs as if one were scrambling them. But just the eggs, not the flour -- yet. Now, with the other, non-fork hand, cradle or cuddle the mound of flour while continuing gently to beat the eggs. Gradually widen the beating motion so that you are slowly incorporating a little of the flour from the inner side of the well into the mixture, then a little more flour, and a little more. Your cradling hand should now be helping by pushing more and more of the flour into the mixture. The key is to make sure your mound of flour holds together through the initial swirling of the eggs, so that the egg mixture does not run out on the surface. We go for the following three options (we are not always as dexterous as we should be and these are easy safety measures):
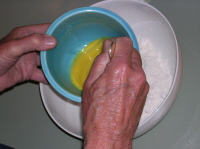
>>option: put the eggs into a small bowl (and in our case add a teaspoon of olive oil, see below) and whip or beat them while they are in the bowl; then drop the already whipped mixture into the well of flour. Then start the whipping motion around the inner edge of the flour, as above, and go on from there. >>option: many pasta-making experts add a teaspoon of olive oil to the eggs before whipping them. Try both ways; make your choice. The olive oil addition does contribute to the smoothness and ease of the mixing and kneading. Purists do not care for the additional olive taste.
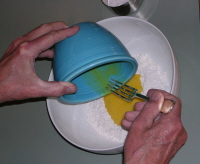
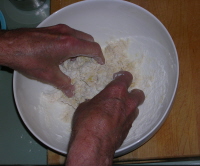
>>option: rather than putting the flour in a mound on a board, and dropping the egg mixture in the middle, and stirring it together, we use a bowl for this process. (We admit that the egg mixture frequently gets away from us on a flat surface and oozes out of our carefully constructed mound of flour.) The bowl, shown here, above, solves our dexterity problem. Put the flour in a large-enough bowl, make the mound with the hole in the middle, stir the eggs and the olive oil together in another bowl, then drop this mixture into the middle of the flour in the larger bowl.
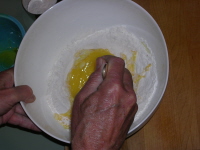
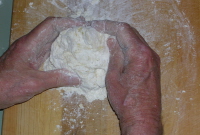
Proceed as before, gradually stirring the egg mixture to incorporate more and more of the flour. But you don't have to worry about the egg mixture getting away from you, it does stay in the large bowl! We then continue to use the bowl doing the first gathering and melding of the flour and egg mixture with our hands (below). When we have got the dough all sort of melded together, we then dump it out on a flat surface and start the kneading.
Now then: all of the flour has mixed in with the eggs and melded together in a very rough mixture. And you have dumped this mixture onto a flat surface. Work this mixture together with your hands,with any remaining flour, pushing and gently squeezing and packing, until it becomes a very rough ball of sticky dough. Continue working and melding and rounding until you get a nice looking ball.
At this point, with a pastry scraper, scrape up all of the leftover flour and egg mixture that has stuck to the board (and your hands). Ideally, one should take the scrapings, and run them through a sieve. Discard the scraps left in the sieve; incorporate the flour that has passed through into your ball. (sometimes we break tradition and do not sieve: just put the little, scraped pieces into the center of the ball of dough, even though the final dough might be a touch lumpy). moistness: Getting and maintaining the proper level of moistness is the key to this whole pasta-making process. Which takes us back to the amount of flour and eggs, and a few other variants. The amount of flour to eggs varies with the size of the eggs, and also the general humidity of the room, and things like that. As you make your own pasta you will get a better feel of the eggs to flour ratio you find gives you success. You can regulate the final moisture in the kneading process (see below). >>option: if you don't want to go the hand route of mixing the dough and the eggs, use the food processor, one large enough to handle the amount of flour. Put the flour into the work bowl. Beat or whip the eggs (with or without the teaspoon of olive oil) in a separate bowl. With the motor running as slowly as possible (but still creating action), slowly add the egg mixture to the flour. Process the mixture until you get a rough, sticky dough. The dough probably is separating into little bean-like pellets. Fine. When it gets to that point, pour it out on the working surface, and do the scooping and amalgamating of the pieces into a rough ball, as above, adding a little flour if the mass is still too sticky and moist. kneading:
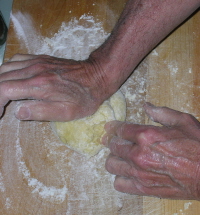
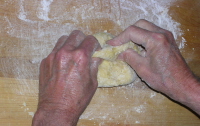
You now have a nice, rough ball of moist dough. Scrape the surface you are working on clean. Wash and dry your hands. Start kneading. This is fun! Push the heel of you hand into the center of the ball. Fold the top over to the bottom. Rotate 90 degrees. Push with the heel again. Fold over. Rotate. Keep this up for about 6 - 10 minutes. You will note that as you continue the kneading, and get the whole rhythm of the thing going, the ball of dough becomes smoother and smoother, and also develops elasticity. This is exciting. Keep this up until you have a real silky smooth ball of dough, and the dough has fought back a little to your kneading (the elasticity). Knead for at least ten minutes; it helps the pasta immensely and it is good exercise. >>Moisture again: if your portions of eggs to flour is all that perfect, your ball of dough is quite moist but does not stick to the working surface. That level of moisture excellence is not always achieved. So: if the dough remains too moist, and it sticks to the surface, while you are kneading, add flour to your hands and a little to the work surface. Continue this very gradual adding of flour until you get the right moistness. It is best to go from too moist to just right. However, if you end up with a beginning mass of dough that is already dry, go the other direction: moisten your hands with warm water and continue the kneading with your moistened hands. The moisture transfers to the dry pasta. Continue moistening your hands until you get the level of moistness in the pasta you are looking for. If the dough remains too dry, it will be nothing but trouble from here on. You now have that wonderful silky ball of dough that you have created by hand. Let it sit, covered by a moist towel, or in a bowl covered with a plastic wrap, for a half hour or so. rolling out the dough (by machine):
Take this silky smooth ball of dough, and, if you have used the three egg portion, cut the ball into four equal parcels. If four eggs, cut it into six pieces. Take one piece and flatten it out into an ellipse, about 3" x 5", sort of like a meat patty. (The advantage of the ellipse shape, as opposed to a round shape, will become apparent as you pass this flattened piece of dough through the machine.)
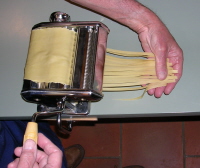
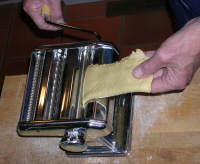
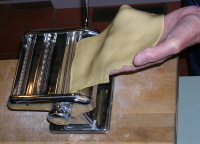
Set the machine to its widest setting (probably number one); gently flour the rollers; and then roll the pasta long-ways through the machine. (Again, for moistness: the dough should be moist but dry enough so that it doesn't stick in the machine.) Take this rolled piece of pasta, fold it in half and roll it through again. Fold it again, this time side over, turn it ninety degrees, and now roll it through again. Continue this process, folding over and about, on the widest setting several times, until you get a very nice and smooth result, preferable in a shape about 2/3 of the width of the machine roller and whatever length works out. Move the setting one notch tighter and run the dough through it. Fold again to keep the optimal shape. Set another notch down, and run it through again and maybe again if you feel like it. Continue until you get the setting that gives you the thickness you desire. (the thinner you go the harder it is to keep the pasta from tearing). Generally you want the thinnest you can get for the stuffed pastas. Fettucine slightly thicker. Lay the flattened piece of dough out on a towel on a side table or draped over a towel on a chair (with plenty of room for the other sheets coming). Go to the second parcel of dough and repeat. And so on, until all the pasta has been rolled into nice long, smooth sheets, ready for cutting. >>note: the real experts do the rolling out and flattening using a long wooden rolling pin: no machine. This is an amazing skill to have, and if you want to develop it, more power! In the books listed in our Library, there are excellent pictorial directions for accomplishing this feat. We simply aren't dexterous enough; hence we use the machine rollers to accomplish the rolling out. However, we admit that we have been involved in a classic test: machine-rolled fresh pasta vs. hand-rolled. The hand-rolled is definitely lighter in texture. >>for stuffed pasta: move immediately into the pasta making process for ravioli and tortellini, and the variations of these stuffed pastas. Do not let the dough dry any further. Also for lasagne. For all other pasta shapes, such as fettucine and tagliatelle, let the rolled sheets dry a little: just enough so that they definitely will not stick as you put them through the cutting rollers of the pasta machine. cutting:
Most machines have two settings on their cutting rollers: fettucine or taglialini. Make your selection. Simply put the pasta sheet through the cutter, and presto, you have the pasta in the style you want. We drape the strings of pasta on tea towels over whatever works, such as the backs of chairs. There are pasta drying tools available. Before the pasta strands get too dry, we like to fold them into sort of nests, which makes them easier to handle going into the boiling water. >>green spinach pasta Use either a ten-ounce package of frozen spinach or about one-half pound of fresh. If using frozen (now thawed, hopefully) spinach, cook it in a covered pan, with a dash of salt, until it is tender. Not long. Drain and put on a paper towel. When cool enough, squeeze as much water out of it as possible. Chop roughly If using fresh spinach, wash it thoroughly, several times probably, to be ultra clean. Drain it and put it in a large pot, over medium heat, covered, and cook about four minutes. Drain and let it cool. When cool, squeeze it to get as much liquid out as possible. Chop roughly >>Note: there will probably be some moisture still involved, so it is possible that your spinach pasta will require a little more flour as you combine it as above. No problem. Put the spinach mixture and the eggs that you are going to use to make the pasta, in a food processor bowl, and process until the spinach is finely chopped. Then add this mixture into the hollow of the flour, as shown above, and continue on. Presto: pasta verde!
|
|||